
WooCommerce Shipping Zones: A Step-by-step Setup Guide


(Editor’s note: if you don’t want to set up Shipping Zones in your WooCommerce store, you can set a flat shipping rate and then pocket or pay the difference for each order.)
This article will take you step-by-step through the process for how to set up your WooCommerce shipping by Zones.
Table of Contents
Is Setting up Shipping Zones Right for my WooCommerce Store?
Every business has unique needs when it comes to shipping, so it’s great that there are different WooCommerce shipping methods you can implement to support your business.
We recommend setting up WooCommerce Shipping Zones if your business meets the following criteria:
Step 1: Determine Your Shipping Rate
You’ll want to have a crystal clear idea of your shipping costs. If you already know your rates, skip this step. Otherwise, we’ll walk you through how to figure out what your carrier will charge to ship your items.
Find Your Average Package Weight
Figure out how much your packages weigh. Ideally, they will all have the same weight. If not, you can decide whether to go with the most-common weight or find an average package weight.
For this scenario, we’re going to assume all of our packages weigh two pounds.
Select Your Service Level
Next, decide which carrier and service level to use. For more information, check out our guide on all of the common USPS service levels for domestic packages.
Today, we’ll focus on USPS Priority Mail rates, since that’s the most-popular service level for e-commerce businesses.
Note Your Rates for Each Zone
Most of the carriers’ prices are based on the package’s weight, dimensions, and distance it travels. That distance—from the origin address to the destination address—is categorized into different Zones. The longer the distance, the higher the Zone, and the more expensive the package will cost.
Use your package weight to look up the shipping price for each Zone. We have a wide sampling of prices in our 2019 USPS postage rates blog post. If you can’t find the weight and service level mix you’re looking for, you can also reach out to our sales team for a personalized rates analysis at sales@goshippo.com.
For today’s example, here are the USPS Priority Mail rates by Zone for a package weighing two pounds.
Step 2: Identify and Prepare Your Shipping Zones
To determine the Shipping Zones for your business, identify the ZIP or postal code for the address where your products are shipped from (also known as origin address). This might be your warehouse, storefront, or other inventory location.
Then, enter that zip code into the USPS domestic zone chart calculator to determine the Zones for any U.S. domestic shipment. Here’s an example of the results we get when we use the first three digits of Shippo’s ZIP code.
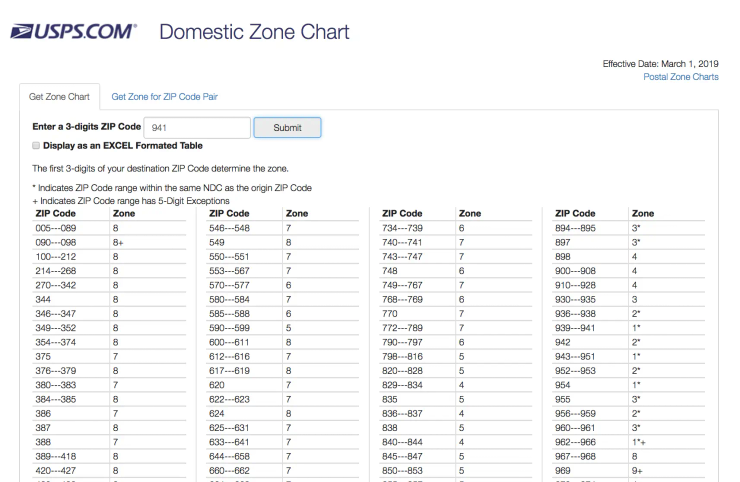
In this example, our warehouse is located in San Francisco. A customer in New York would fall in Zone 8 (pretty far and expensive). While a customer in Los Angeles, California would fall in Zone 4 (closer and less expensive).
Group All of the ZIP Codes by Zone
Once you’ve identified which ZIP or postal codes fall into which Zone, then you’ll want to organize that information so that you can add it to your WooCommerce store.
Start a list of all the ZIP codes that fall under Zone 1, then do the same for the rest of the Zones.
To make it easier, use the following WooCommerce shortcuts: wildcards (e.g. CB23*) and fully numeric ranges (e.g. 90210…99000).
As you’ll see below, we grouped the ZIP codes for each Zone from our office in San Francisco as an example. Your table will look different than this, depending on your origin ZIP code.
Now, you’re ready to input this information into your WooCommerce store.
Step 3: Set up Your WooCommerce Shipping Zones with Accurate Rate Information
Once inside your WordPress dashboard, go to WooCommerce > Settings > Shipping.


Step 4: Generate Labels With Shippo
Once you’ve set up your WooCommerce Shipping Zones, you’ll want to sync your store with a shipping software like Shippo that offers a WooCommerce shipping plugin to create shipping labels that cost the same amount as the price you’re charging your customers.
Shippo is a free, out-of-the-box integration with WooCommerce. Here’s how it works:
Sync your WooCommerce store with Shippo in just three easy steps. Check out our Help Center article for the instructions.
Congrats! Once you complete these steps, your WooCommerce Shipping Zones will be set up and you’ll be ready to ship orders to your customers. Test it for yourself by creating a few new orders and selecting unique ZIP codes.
Questions? Contact our shipping experts at sales@goshippo.com.
Happy shipping! Using WooCommerce Shipping Zones is one of the most cost-effective ways to charge your customers for shipping during the checkout process. Here’s why: the major carriers have different shipping rates based on the distance the package will travel from the origin and destination addresses. Shorter distances usually mean lower prices and vice versa. These distances are broken up into Shipping Zones (more about that later). By setting up WooCommerce Shipping Zones in your WooCommerce shopping cart, you’re able to pass along the correct shipping rate to your customer.
Looking for a multi-carrier shipping platform?
With Shippo, shipping is as easy as it should be.
- Pre-built integrations into shopping carts like Magento, Shopify, Amazon, eBay, and others.
- Support for dozens of carriers including USPS, FedEx, UPS, and DHL.
- Speed through your shipping with automations, bulk label purchase, and more.
- Shipping Insurance: Insure your packages at an affordable cost.
- Shipping API for building your own shipping solution.
Stay in touch with the latest insights
Be the first to get the latest product releases, expert tips, and industry news to help you save time and money on shipping.
Loading...
Thanks for your submission!


.png)
.png)


